How to Make Healthy Meal Prep Bowls for Busy Weeks
Nourish Your Body, Simplify Your Life
Introduction: Why Meal Prep Bowls Save Time and Health
In the relentless rhythm of modern life, few challenges are as pervasive as the daily struggle between maintaining a healthy diet and managing a hectic schedule. We live in an era where convenience often trumps nutrition, leading to a cycle of reliance on fast food, delivery apps, and vending machine snacks. However, the reality is stark: poor dietary choices accumulate over time, manifesting as chronic fatigue, brain fog, and increased healthcare costs. This is where the strategic implementation of healthy meal prep bowls transforms from a mere trend into a lifestyle necessity.
The Burden of Decision Fatigue
One of the most underestimated aspects of daily productivity is decision fatigue. By the time you finish a day of work meetings, emails, and family obligations, the mental bandwidth required to decide what to cook for dinner is virtually nonexistent. When the brain is depleted, it craves immediate dopamine hits, which usually come from sugary or highly processed foods. Meal prepping eliminates this daily friction. By dedicating a few hours on a weekend to preparing components for the upcoming week, you remove the variable of "what to eat" from your daily equation. Instead of staring into a refrigerator deciding on ingredients, you have a stack of organized, nutritious options ready to go.
Financial and Nutritional Efficiency
Beyond mental health, there is a profound economic advantage to meal prepping. Dining out or ordering takeout five times a week can easily surpass several hundred dollars monthly. In contrast, buying raw ingredients in bulk allows you to control portion sizes and ingredient quality without the markup of restaurant overhead. Furthermore, meal prep bowls offer unparalleled control over macronutrients. Fast food is notoriously high in sodium, unhealthy fats, and hidden sugars. When you prepare your own bowls, you determine the balance of carbohydrates, proteins, and fiber. This precision ensures you fuel your body with sustained energy rather than the sugar crashes associated with processed meals.
Building a Sustainable Routine
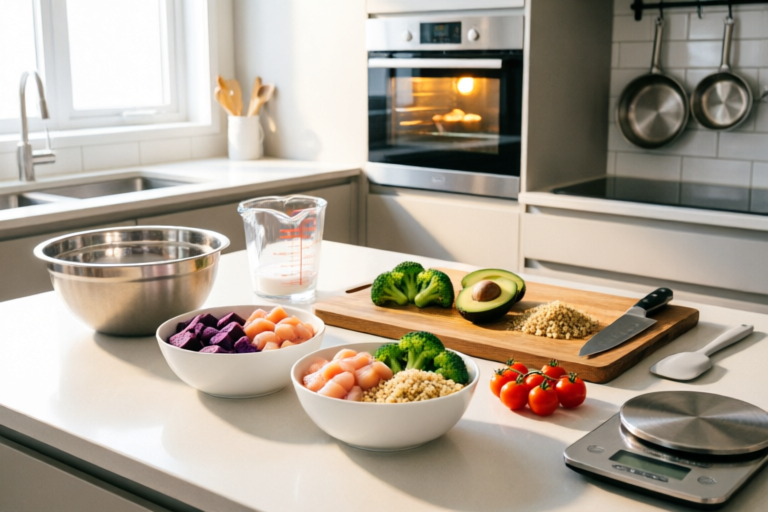
A meal prep bowl is more than just leftovers stored in a container; it is a structured system of balanced nutrition designed for longevity. These bowls typically consist of a complex carbohydrate base, a lean protein source, a generous serving of vegetables, and healthy fats. When executed correctly, they remain delicious even after being refrigerated for three to four days. This guide will walk you through the entire lifecycle of meal prepping, from selecting versatile ingredients to storage best practices, ensuring you can thrive in a busy week without sacrificing your health goals.
Planning: Choosing Versatile Ingredients for Multiple Meals
The foundation of successful meal prepping lies not in the cooking, but in the planning phase. Many beginners fail because they spend hours cooking a specific dish that tastes great immediately but turns mushy or dry after two days of refrigeration. To build a sustainable meal prep system, you must select ingredients based on versatility, shelf life, and nutritional density.
Selecting the Right Grains and Bases
Your grain choice sets the caloric baseline and texture profile of your bowl. Avoid white pasta or instant rice, which tends to degrade quickly. Instead, opt for whole grains that hold their shape. Quinoa is a superstar for its high protein content and fluffy texture. Brown rice retains a pleasant chewiness that works well in cold salads or warm reheats. Sweet potatoes are another excellent option; when roasted until caramelized, they offer natural sweetness and robustness against soggy conditions. Barley and farro provide hearty textures that mimic meat, adding substance to vegetarian options. For gluten-free needs, cauliflower rice or shirataki noodles are viable low-carb alternatives.
Protein Strategies for Shelf Stability
Proteins vary wildly in how well they fare in the fridge. Canned beans, lentils, and chickpeas are inherently sturdy; once cooked or rinsed, they maintain their integrity for up to five days. Hard-boiled eggs can be a bit rubbery if cooked over the top, but perfectly set eggs slice nicely. Chicken breast, however, requires attention. Marinate it beforehand and avoid overcooking; pull it from the oven when it reaches 160°F (71°C) rather than 165°F, as carryover cooking will otherwise dry it out completely. Ground turkey or beef browns quickly and stores well. Plant-based proteins like extra-firm tofu should be pressed to remove moisture before roasting to prevent them from becoming slippery or slimy upon storage.
Vegetable Tiers: Hard vs. Soft
Not all vegetables are created equal in the world of storage. You must categorize your veggie choices into "hard" and "soft." Root vegetables like carrots, broccoli, bell peppers, zucchini, and Brussels sprouts excel in meal prep because they can withstand refrigeration without losing their crunch. Leafy greens like spinach, kale, and lettuce, unfortunately, tend to wilt and rot quickly once mixed with dressing and stored. The strategy here is modular. Store the hard-cooked veggies in your bowls, but keep fresh leafy greens in a separate container to add right before eating. Alternatively, massage kale with olive oil to toughen it slightly, allowing it to last longer without wilting as rapidly as spinach.
The Flavor Matrix
To prevent taste fatigue, plan your flavor profiles differently for each bowl throughout the week. If Monday is Mediterranean-style (lemon, oregano, cucumber), Tuesday could be Asian-inspired (soy, ginger, sesame). Wednesday might shift toward Mexican flavors (cumin, chili powder, salsa). By rotating sauces and seasonings, you can use the same base ingredients (grain, chicken, roasted peppers) but achieve distinct tastes. Create a "seasoning matrix" on Sunday night: mix olive oil with lemon juice and garlic for one day, tamari with sriracha for another. This keeps the palate engaged and makes the bowls something to look forward to rather than endure.
Cooking: Efficient Batch Preparation Techniques
Once your plan is solidified, the execution phase begins. Efficiency is key; you want to minimize time spent standing over hot stoves while maximizing output. The goal is to utilize equipment that cooks multiple items simultaneously, reducing the physical toll on your body during the prep session.
The Sheet Pan Method
The sheet pan method is the cornerstone of efficient vegetable preparation. Place a large baking sheet lined with parchment paper or a silicone mat. On one side, arrange root vegetables cut into uniform pieces—uniformity ensures even cooking. On the other side, place cruciferous vegetables like broccoli or cauliflower. Drizzle everything generously with oil, salt, and pepper. Roast at 400°F (200°C) for 25 to 30 minutes. While the vegetables roast, you can attend to your proteins. This method cleans up incredibly fast since you only have one pan to wash. Additionally, high-heat roasting concentrates flavors and creates crispy edges, which adds texture to the bowl that steamed vegetables lack.
Cooking Large Portions of Lean Protein
For proteins like chicken thighs or drumsticks, a baking tray is ideal. Unlike breasts, thighs contain higher fat content which helps them stay juicy during storage. Season them liberally before placing them on the rack, allowing air circulation underneath the meat for even browning. If using a pressure cooker (Instant Pot), you can cook dried beans or brown rice faster. Boiling ground meat or searing batches of chicken strips works well on a stovetop. Always remember to let the protein rest before slicing. If you cut into it immediately while piping hot, the juices run out, leaving the meat dry after reheating. Allow it to sit for 5 to 10 minutes.
Minimizing Kitchen Cleanup
Cleanup can deter people from meal prepping more than the cooking itself. Employ the "wash as you go" philosophy. Put ingredients into bowls before chopping the next item. Use a cutting board for both fruits and vegetables (washing it thoroughly in between) to avoid cross-contamination without needing multiple boards. When possible, use foil liners for pans; once cooking is done, peel the foil off, dispose of it, and toss the pan directly in the dishwasher. If hand washing is necessary, soak pans filled with water immediately to loosen debris. Using a large colander to rinse multiple grains at once reduces time wasted on individual bowls.
The Mise-en-place Approach
In professional kitchens, chefs rely on "mise-en-place," or everything in its place. Apply this logic at home. Before turning on the oven, chop all your vegetables. Measure all your spices into small ramekins. Portion your grains into cups. This prevents scrambling for items while cooking starts. It also visualizes the workload; seeing five chopped bowls ready for seasoning helps you maintain focus. If you find yourself overwhelmed, break the task down. Do not attempt to prep seven days' worth of meals in one marathon session if you have never done it before. Start with three or four days to gauge your capacity, then gradually increase the volume.
Assembly: Creating Balanced and Appealing Combinations
Having prepped your components separately, assembly is where the magic happens. It is the stage where you combine your ingredients into cohesive, appetizing, and nutritionally sound meals. A poorly assembled bowl might be nutritionally balanced but visually unappealing, leading to reduced consumption. Conversely, an aesthetic presentation signals freshness and encourages adherence to the plan.
The Macro Distribution Formula
To ensure nutritional adequacy, follow a simple formula for every bowl. Aim for a ratio of 2 parts carbohydrates to 1 part protein to 3 parts vegetables, adjusting based on your specific activity level. For example, fill half the container with non-starchy vegetables or hard-cooked vegetables like peas or corn. Dedicate a quarter to your protein (meat, tofu, legumes). Reserve the remaining quarter for complex carbs (quinoa, brown rice, sweet potato). This distribution ensures you have ample fiber for satiety, sufficient protein for muscle repair, and adequate energy sources. This balance is crucial for preventing blood sugar spikes that cause afternoon lethargy.
Texture Variety is Key
One of the biggest complaints about meal prep is the "mushy" factor. After sitting in the fridge, grains absorb moisture and proteins soften. To combat this, layer textures intentionally. Include crunchy elements that are added last-minute or kept separate. Almonds, walnuts, sunflower seeds, pumpkin seeds, or croutons should be stored in small bags alongside the containers. Sprinkle them on top just before eating. Another trick is to keep the base layer distinct. Some people find it refreshing to serve the protein warm and the vegetables cool, creating a temperature contrast that enhances the dining experience. If reheating, consider heating the protein in the microwave and leaving the cold salad portions chilled.
Visual Appeal and Color Theory
Eat with your eyes first. A monochromatic bowl (all beige from rice and chicken) looks unappetizing compared to a vibrant mix. Use the rainbow principle. Add red bell peppers, orange carrots, green broccoli, purple cabbage, or yellow corn. Green vegetables like avocado slices or cilantro garnishes signal freshness. If you are using a clear plastic container (which is fine for freezer use but glass is better for heating), the color variety is visible even through the lid. This visual cue increases anticipation. Furthermore, arrange components rather than mixing them entirely. Rows of ingredients look more deliberate and organized than a chaotic pile, suggesting care was taken in the preparation.
Managing Dressings and Moisture
This is perhaps the most critical technical aspect of assembly. Never pour dressing over a mixed bowl before refrigeration unless the dressing is an oil-and-vinegar emulsion with acidic properties (like lemon vinaigrette). Cream-based dressings will curdle and spoil the texture. Heavy oils can saturate the grain, making it soggy. Instead, use the "Dressing on the Side" method. Pour a small amount of dressing into a separate small container, ideally shaped like a dipping cup. When you are ready to eat, pour the dressing over the bowl and toss it yourself. Alternatively, pack dressing in ice cube trays or small compartments within the lid of your main container. This ensures every bite remains crisp and flavorful, preserving the structural integrity of the vegetables and grains.
Storage: Proper Packaging and Reheating Guidelines
The final step in the chain is storage and retrieval. Even the best-prepared meal can be ruined by improper packaging or incorrect reheating temperatures. Understanding the logistics of food preservation ensures safety and maximizes the palatability of your meals.
Selecting the Right Containers
Invest in high-quality, airtight containers. Plastic containers made from BPA-free materials are lightweight and durable, ideal for carrying to work. However, glass containers are superior for oven reheating and freezer safety, as they do not leach chemicals when heated. Look for containers with compartmentalization. Having a built-in divider for your dressing prevents leaks and separates the moist components from the dry ones. Square containers stack better in the refrigerator and pantry than round ones, maximizing vertical space. Ensure lids snap securely; a loose seal invites oxidation, which leads to bacterial growth and food spoilage. Also, mark each container with the date prepared and contents written in marker, so you know the expiration window clearly.
Distinguishing Between Fridge and Freezer Options
Most meal prep bowls are designed for 3 to 4 days of fridge storage. Cooked grains and meats are generally safe in the fridge for up to 5 days, provided the fridge is maintained below 40°F (4°C). Anything beyond that risks the growth of Listeria and Salmonella. If you plan to freeze some meals, note that certain ingredients do not translate well. Foods with high water content like cucumbers, lettuce, tomatoes, and onions become watery and unappealing when thawed. If freezing, exclude these toppings. Cooked meats like shredded chicken and rice freeze exceptionally well. Thaw frozen meals in the refrigerator overnight before reheating to ensure even warming and food safety. Avoid thawing at room temperature, as the outer layers may enter the danger zone while the center remains frozen.
Safe Reheating Methods
When it is time to eat, proper reheating restores warmth without destroying nutrients. Microwave reheating is convenient but uneven. Place the food in a microwave-safe dish with a lid vented or use a damp paper towel over the bowl to trap steam. Heat in intervals of 90 seconds, stirring in between, to ensure the center reaches 165°F (74°C). If you are worried about dryness, add a tablespoon of water before microwaving. If you have access to an oven or toaster oven, spreading the food out on a baking sheet and heating at 350°F (175°C) for 10 minutes can restore the crispiness of roasted vegetables better than a microwave. Always stir the contents to distribute heat evenly. Remember to check that there are no cold spots before consuming.
Troubleshooting Common Issues
If your bowls end up dry upon reheating, your initial cooking time might have been too long. Future preparations should account for the fact that reheating evaporates additional moisture. If grains become gummy, store them slightly undercooked (al dente), as they continue to soften in the fridge. If sauces separate, shake them vigorously or whisk them again before using. Sometimes a fresh squeeze of lemon juice or a dash of soy sauce revives the flavor after the fridge dulls the spices. Don't be afraid to experiment with garnishes after reheating, such as fresh herbs or nuts, to bring life back to the dish.
Conclusion: Empowering Your Week Ahead
Crafting healthy meal prep bowls is a skill that pays dividends in every dimension of your life. It saves you money, preserves your health, and buys you valuable time back for hobbies, rest, and family. It is a powerful declaration that your well-being matters enough to invest time in it. While the initial learning curve requires effort, the return on investment is immediate satisfaction and consistent energy. By following the strategies outlined above—planning versatile ingredients, utilizing efficient cooking techniques, assembling thoughtfully, and storing correctly—you transform the daunting task of feeding yourself into a seamless, enjoyable routine. Embrace the process, adjust the recipes to your taste, and watch your busy weeks become manageable, nourishing journeys rather than stressful trials.
Comments

finally feeling organized with dinner. thanks for posting this!

great tips on assembly! putting the dressing on separately was the best move

be careful with the veggies tho, mine turned soggy by midweek. maybe roast them longer next time

Tried this, loved it!
subbed tofu instead of chicken to keep it lighter, worked perfectly

quick question - can i freeze the cooked rice in individual portions?
just made these yesterday, honestly surprised how tasty the leftovers were. saved me from ordering pizza tonight lol