Breakfast & Brunch
How to Make Fluffy Scrambled Eggs in Under Five Minutes
Breakfast Reimagined, One Minute at a Time
## Introduction: The Quest for the Perfect Quick Breakfast
In the hustle and bustle of modern life, the morning routine often feels like a race against the clock. We wake up tired, we face a packed schedule, and we desperately need a fuel source to kickstart our day. For many of us, this means breakfast. However, breakfast is often where nutrition gets sacrificed at the altar of convenience. We reach for sugary cereals, dry granola bars, or skip the meal entirely, only to suffer through mid-morning crashes and cravings later.
There is a distinct desire for a nutritious yet rapid morning meal that does not feel like a chore. We want energy, satisfaction, and flavor. At the center of this culinary quest stands one humble ingredient: the egg. Whether you call them morning clouds or golden pillows, eggs are a nutritional powerhouse, rich in protein and healthy fats. Yet, despite their ubiquity, the humble scrambled egg remains a source of frustration for countless home cooks. Too often, the result is dry, rubbery, or chalky rather than light and tender.
This article promises to change that narrative. We are embarking on a journey to achieve fluffy results within five minutes. Yes, five minutes. It sounds almost magical, given the meticulous care some gourmet chefs take with eggs, but it is entirely achievable in your own kitchen with the right approach. The secret lies not in expensive equipment or exotic ingredients, but in understanding the science of heat and protein.
By following this guide, you will learn to transform ordinary table eggs into a velvety, cloud-like masterpiece that takes mere moments to prepare. We will cover everything from the initial whisking to the precise moment of removal from the pan. Whether you are a college student living in a dormitory, a busy parent getting kids to school, or simply someone who wants to elevate their daily routine, mastering this dish is the key to unlocking a better morning. So, roll up your sleeves, grab your favorite pan, and let's begin the quest for the perfect quick breakfast.
## Essential Tools and Ingredients for Speed
Efficiency in the kitchen is synonymous with preparation. Before you even crack an egg, the success of your fluffy scrambled eggs depends heavily on what tools and ingredients you have on hand. While it is tempting to grab whatever is closest to hand, having specific items dedicated to this task can significantly reduce friction and improve the final quality. We are aiming for under five minutes, so every second counts, and the right gear saves time spent dealing with stuck food or uneven cooking.
### The Non-Stick Advantage
First and foremost, the vehicle of your cooking should be a high-quality non-stick skillet. While stainless steel or cast iron are excellent choices for searing meats or browning pancakes, they present challenges when cooking delicate eggs. Eggs are low in fat and prone to sticking unless there is sufficient oil or butter, and high heat causes them to bond instantly to the metal. A reputable non-stick pan creates a safe barrier between the egg proteins and the metal surface, allowing for gentle movement and easy cleaning.
You do not need a professional-grade brand, but ensure the coating is intact. Scratches in the Teflon or ceramic coating can lead to hot spots where eggs stick and burn, disrupting your five-minute timeline. Ideally, look for a 10-inch skillet with sloped sides. Sloped sides facilitate easier flipping and stirring, unlike straight-sided sauté pans which make folding the eggs over difficult. For speed, the ability to slide the entire batch onto a plate without cutting it apart is crucial. A smooth, wide interior ensures even heat distribution, meaning you don't have to wait for a large portion of the pan to heat up.
### The Spatula Choice
Your utensil of choice is just as important as the pan. Metal spoons or forks will scratch the non-stick coating, defeating its purpose. Instead, opt for a silicone spatula with a flat edge and a flexible head. Silicone withstands high temperatures without melting and is gentle enough to glide under the eggs without tearing them apart. The flexibility allows you to scrape the edges of the pan effectively, ensuring no stray bits of egg stick and burn, which could ruin the texture of the rest of the scramble. A wooden spoon is also a viable alternative, though slightly less efficient at scraping the corners compared to a specialized silicon turner.
### Ingredient Selection for Quality
When speed is the goal, quality ingredients matter even more because they compensate for shorter cooking times. Starting with fresh eggs is non-negotiable. Fresh eggs have tighter whites and firmer yolks, which hold their shape better during vigorous whisking and cooking. If you buy supermarket eggs, try to find those labeled "large" or "extra large." These provide consistent volume for standard recipes, ensuring your timing calculations remain accurate.
Butter is the traditional choice for richness, but consider the salted versus unsalted distinction. Using unsalted butter gives you control over the sodium level in your dish, whereas salted butter adds complexity but might require you to adjust seasoning later. Since we are moving fast, melted salted butter can save you the step of salting separately, adding immediate savory notes. Do not skimp on the fat; butter carries flavor and helps lubricate the eggs.
Some purists argue for water or heavy cream when beating eggs. Water creates steam during cooking, leading to larger, fluffier curds. Heavy cream, however, adds richness and tenderness. For a quick and fluffy result, a splash of cold whole milk or cream is recommended. It stabilizes the egg proteins, preventing them from tightening too aggressively. You might experiment with half-and-half, which offers a middle ground between milk and cream for optimal texture without making the eggs soggy.
### Bowl and Whisk Selection
While you can crack eggs directly into a bowl, cracking them individually into the bowl prevents shell fragments from contaminating the mixture. However, if you are rushing, you can crack them carefully into the frying pan. That said, pre-whisking is vital for airiness. A small mixing bowl with a rounded bottom makes it easier to incorporate air efficiently. Similarly, a fork is sufficient for most purposes, but a balloon whisk introduces more oxygen into the mixture faster due to its wire tines. This tool becomes the catalyst for that airy texture we seek, physically working air bubbles into the liquid before heat even touches them. Having everything assembled before turning on the stove eliminates the "cluttered counter" problem that slows down cooking time.
## The Critical Whisking Technique for Airiness
Once you have gathered your tools and ingredients, the magic truly begins before the heat is even applied. Many people believe that the texture of scrambled eggs is determined solely by the heat of the pan. While heat is critical, the mechanical action of whisking is the primary driver of fluffiness. If you skip this step or do it poorly, your eggs will remain dense, regardless of how perfectly you manage the stove settings. This phase is where you build the foundation for airiness.
### Understanding the Science of Aeration
To understand why we whisk, we must briefly touch upon protein chemistry. Egg whites contain proteins folded into tight coils. When you whisk vigorously, you apply physical force that unfolds (denatures) some of these proteins and traps tiny pockets of air within the liquid matrix. As the eggs heat, these air pockets expand, causing the mixture to rise and create a porous, sponge-like structure. Without this trapped air, the eggs would essentially just poach in themselves, resulting in a solid mass rather than soft curds.
However, over-whisking can be detrimental. If you beat the eggs for too long before cooking, the protein chains can become too tightly linked, creating a dense network that squeezes out moisture during cooking. This leads to rubbery textures. Therefore, the goal is to find the sweet spot: vigorous enough to create foam, but brief enough to maintain structural integrity. You want the mixture to look pale yellow and slightly frothy on top, rather than completely homogeneous and clear.
### The Visual Cue of Readiness
So, how do you know when the eggs are whisked sufficiently? The best method relies on visual observation. Crack your two or three eggs into your chosen bowl. Add a teaspoon of milk or water per egg. Begin whisking rapidly with your fork or balloon whisk. Watch the mixture closely. Initially, you will see streaks of white and yolk. As you continue, the color should unify into a vibrant, bright yellow. Then, keep going until small bubbles form on the surface.
Do not stop as soon as the colors blend. Continue whisking for another ten to fifteen seconds after the blending is complete. The mixture should have a slight thickness to it, similar to pancake batter, rather than watery consistency. This increased viscosity indicates that enough air has been incorporated to support the volume growth during heating. Pouring the mixture into the pan, it should sizzle slightly immediately upon contact, indicating it is ready for the heat.
### The Salt Timing Debate
A common question regarding whisking is when to add salt. Scientific studies suggest salting too early draws moisture out of the eggs via osmosis, potentially thinning the mixture. However, many chefs argue that salting immediately helps the salt dissolve evenly into the beaten mixture. For a quick breakfast method, we recommend salting right before cooking. Mix your salt into the whisked eggs just before pouring them into the pan. This ensures the salt dissolves into the liquid state without breaking down the protein structure prematurely. Adding pepper now is acceptable, though some prefer to sprinkle black pepper on top after plating for a fresher aroma. Consistency is key here; use approximately half a teaspoon of salt for every two eggs. Remember, if using salted butter, reduce the added salt accordingly to avoid an overly salty breakfast. This attention to detail ensures that the flavors are balanced without competing with the natural sweetness of the egg yolks.
### Resting the Batter (Optional)
While we are focused on speed, some experts suggest letting the whisked eggs sit for a minute before cooking. This allows the gluten bonds (if flour were present, which it isn't, but generally for egg structures) and protein strands to relax slightly. For a strict five-minute limit, this is optional. However, if you have the luxury of thirty extra seconds, allowing the air bubbles to stabilize can prevent collapse during the initial shock of heat. Simply pour the eggs into the hot pan within sixty seconds of whisking. There is no need for complex resting periods that add unnecessary steps to your routine.
## Heat Management and Stirring Strategy
With the eggs whisked to perfection, we move to the most sensitive part of the operation: cooking. Here lies the difference between a burnt mess and a Michelin-star quality scramble. The mantra for fluffy scrambled eggs is "Low and Slow," which paradoxically seems counterintuitive when you are trying to finish in under five minutes. High heat cooks things faster, yes, but it also toughens proteins and drives out moisture rapidly. To achieve softness, we must treat the eggs gently.
### Setting the Stove Temperature
Start by placing your non-stick pan on the burner. Turn the heat to medium-low. Most modern stoves have numbered dials, which can vary wildly in accuracy. Trust your eyes more than the numbers. After a minute, drip a few drops of water onto the pan surface. If the water dances and evaporates slowly, the pan is too cool. If it splashes and burns instantly, it is too hot. You want a steady hiss, similar to steam escaping a tea kettle. If you have a digital thermometer, aim for a pan surface temperature of around 275°F to 300°F (135°C to 150°C).
Add your butter now. Allow it to melt and foam slightly, but do not let it brown. Brown butter (beurre noisette) adds great flavor but changes the pH balance and can cause the eggs to grayish tones, affecting visual appeal for a quick breakfast. Once the butter is fully melted and covers the surface, it is time for the eggs.
### The First Pour and Immediate Action
Pour your whisked egg mixture into the center of the pan. It should spread out automatically due to gravity. Immediately pick up your spatula. This is where timing is critical. Do not wait for the bottom to set before acting. You must begin stirring within three to five seconds of pouring. If you wait, the bottom layer will form a firm crust, creating large, hard pieces instead of soft curds.
Use the spatula to push the cooked portions from the edges toward the center. Imagine you are folding a map. As you stir, the raw egg that is still liquid will fill the empty spaces you created near the outer walls. This continuous displacement distributes the heat evenly throughout the entire batch, cooking multiple layers simultaneously. This technique is known as the "curtain method" or the "fold-over." Keep the motion constant and gentle. Aggressive chopping with the spatula will break down the cells too much.
### Managing Residual Heat
One of the most misunderstood concepts in cooking eggs is residual heat. You should never cook the eggs until they look fully done in the pan. They should look slightly wet and undercooked when you decide they are finished. Why? Because the pan retains heat, and the eggs will continue to cook for another thirty seconds to a minute after you remove them from the burner. If you cook them to your desired dryness on the stove, they will be overcooked by the time you get the first bite.
As the eggs thicken, the curds will grow from microscopic particles to visible flakes. Stop the stirring when the curds are about 80% set. Remove the pan from the heat immediately. Transfer them to a warm plate. The residual heat of the pan and the eggs themselves will bring them to 100% doneness on the plate. This technique guarantees a creamy, custard-like interior rather than a dry, grainy texture.
### Troubleshooting Common Errors
Despite best efforts, mistakes happen. If the eggs start to stick, lower the heat immediately and add a teaspoon of extra butter or milk. If the eggs turn gray, you likely had the heat too high, causing oxidation of the sulfur in the yolk mixed with the egg whites. This does not make them toxic, but it affects taste and appearance. If the eggs are too dry, your heat was likely too high for too long. Next time, dial back the flame and remove the pan sooner. Remember, practice refines this instinct. Over a few attempts, you will develop a feel for exactly when the eggs have reached that perfect threshold of doneness.
### Adjusting for Volume
If you are cooking for multiple people, do not crowd the pan. While stacking eggs in the pan sounds faster, it steams them rather than fries them, leading to a different texture. Cook them in batches if necessary, or use a larger pan. Cooking in batches takes a bit longer, so plan accordingly. Alternatively, if cooking a double batch, mix the eggs together in a single large bowl but pour them carefully into the pan to ensure even coverage. Maintaining a shallow layer maximizes surface area contact with the heat, promoting uniform cooking speed. Speed is key to retaining moisture.
## Conclusion: Plating Tips and Final Encouragement
You have navigated the tools, mastered the whisking, and conquered the heat. Your scrambled eggs are glistening, golden, and ready to eat. Now, the final act: presentation. Plating is not just about looking good; it sets the tone for your meal. Serving the eggs immediately is non-negotiable. As discussed earlier, they begin to tighten the moment they leave the heat.
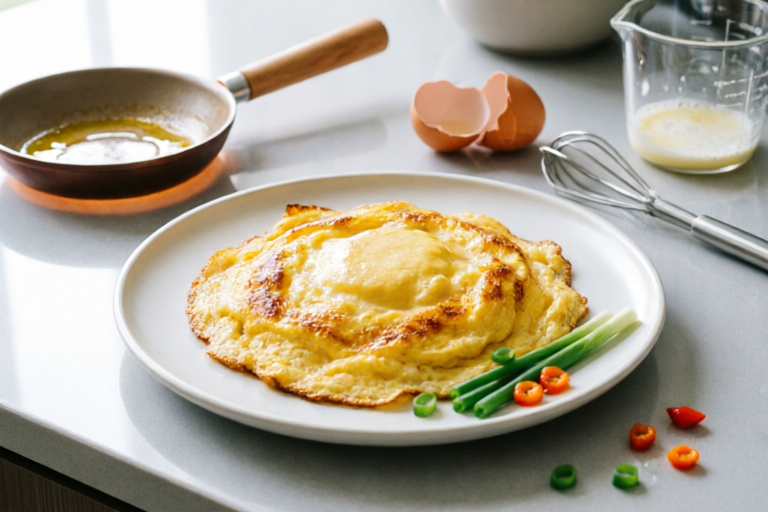
### Serving for Maximum Impact
Warm your plates beforehand. Place the plate in the microwave for thirty seconds with a cup of hot water next to it. Cold plates will rob the eggs of their warmth instantly, diminishing the comfort factor of breakfast. Slide the eggs onto the center of the warm plate. Do not heap them too high; allow them to settle naturally. Sprinkle fresh chives or chopped parsley on top. The green garnish provides a pop of color that contrasts beautifully with the yellow curds. A pinch of coarse sea salt can add a satisfying crunch and burst of flavor.
Consider your side dishes. Toasted sourdough bread brushed with garlic butter complements the soft texture of the eggs perfectly. Avocado slices add creaminess and healthy fats. A side of cherry tomatoes adds acidity to cut through the richness. All these sides can be prepared quickly while you cook the eggs, keeping your total breakfast time well under twenty minutes while the core dish remains the star.
### Integrating into Your Routine
Now that you possess the skills, integrating this into a daily routine is straightforward. Keep your pan and whisk clean and ready. Prepare any toppings the night before. Have your ingredients measured and ready in the fridge. The more you automate the setup, the faster the process becomes. You may find yourself able to whip up a batch in three minutes flat once you are comfortable with the motions. This reduction in morning stress cannot be overstated. Waking up knowing you can provide a high-quality, hot, and nutritious meal for yourself or your family without panic is a significant psychological win.
### Final Words of Encouragement
Cooking should be an act of love, not just a necessity. Even though we are racing against the clock today, remember that taking five minutes to prepare your own food is a gift to your future self. It is a pause in the chaos that grounds you before the workday begins. These fluffy scrambled eggs are more than just food; they are a starting point for productivity and health. Don't be afraid to tweak the recipe. Try adding cheese in the pan for a melty pull, or herbs dried in the whisk.
We hope this guide has demystified the process of cooking the perfect fluffy scrambled eggs. By utilizing the right tools, embracing the science of whisking, and respecting the heat, you have unlocked the potential of one of the world's oldest superfoods. Go ahead and try it tomorrow morning. Set the timer. Beat the eggs. Stir the curds. Taste the success. You have everything you need to transform a chaotic morning into a calm, delicious ritual. Enjoy your breakfast, and enjoy the freedom that comes with mastering your own kitchen.
## Frequently Asked Questions
**Q: Can I make these vegan?**
Yes! You can substitute animal-based eggs with commercial egg replacers made from pea protein or aquafaba (chickpea water). While the texture will differ slightly, the same whisking and low-heat principles apply to achieve a fluffy plant-based scramble.
**Q: What kind of milk works best?**
Whole milk provides the richest texture, but oat milk or almond milk work well for dairy-free options. Avoid skim milk as it can separate too easily under high heat.
**Q: Is it okay to use olive oil instead of butter?**
Absolutely. Olive oil has a higher smoke point and a fruity note that pairs well with savory eggs. Just ensure you use a lighter touch so the flavor doesn't overpower the eggs.
**Q: How far in advance can I prep the eggs?**
For the fluffiest results, cook immediately. Pre-cooking and reheating eggs often results in a loss of volume and texture. However, you can pre-crack and whisk them in a container in the fridge for up to a day, though fresh is always best.
Comments

JennaK
Tried it, loved it! 😋
👍 22👎 0

FoodieFinds
Perfect texture! Served with toast dipped right into it. Yum.
👍 18👎 0

MikeTheCook
Honestly, I found low heat was key. Burned them once turning it up too fast. Patience wins!
👍 14👎 0
BusyMomOf3
My toddler actually ate them without complaining lol. Definitely making this a weekly thing now.
👍 27👎 0

EggQueen_23
I added some sharp cheddar at the end. Absolute game changer. Also, do not skip the butter trust me.
👍 3👎 0

MorningDave
Quick question - does this work well with almond milk instead of regular? Trying to cut down on dairy but want the creaminess.
👍 6👎 0
SarahBakes
Tried this this morning for my morning rush! The whisking tip really made a difference, way fluffier than usual.
👍 3👎 0